Art 1600 / Greg Clayton
Required Content and Alternatives
Below is a listing of the pages/sections and topics that you are to include.
Note that many topics offer options–you will pick from these items, you willl not do ALL of the listed options.
Be sure you're clear on what is required and which are menu options.
These topics are listed in the order they should typically appear in the study.Book Format Total Pages: 12, including cover and references
| Required Pages/ Contents and/or Features | Pgs |
Book Format Projects |
IDAA/Arch Space Plan |
| General Concept Development | Book format projects focus on:
Developing strong communication graphics that inform the viewer of your design analysis discoveries. (Content) Engaging the viewer's attention and interest. Developing and presenting a strong, unified, multipage design that expresses a distinct graphic approach influenced by the forms of your nature subject. Well executed craft and presentation. Documentation of all stages of your project development in your Semester Portfolio.
|
Space Plan projects focus on:
Developing clear communication graphics that inform the viewer of your design analysis discoveries. (Content) Developing an engaging space concept that is consistent with a specific use, audience and location. Developing sketches and/or rough models of your space concept adequate to clearly convey the distinct qualities, form and atmosphere of the concept. (you are not required to develop detailed plans/elevations/renderings or models. You are expected to develop and communicate a space concept, not a finished design.) Developing and presenting well-organized presentation boards that clearly communicate your unified and distinctive designed space concept and how that concept is influenced by your nature subject. (Graphic Concept) Well executed craft and presentation. Documentation of all stages of your project development in your Semester Portfolio. |
|
| Cover Page | 1 | Introduce the viewer/reader to your study.
|
Your 1st board should introduce the project. One board should include prominent title and introductory plan. Present a clear concept for the purpose and distinctive character of your space concept. |
| Table of Contents | 1 | Provide a title and/or description for each page. Include a page number (or link) for each. |
Skip this. |
| Written Introduction | 1 | A brief but engaging description of what is to follow—introduce readers to the subject and the scope of of your study's content. |
Include concept/programming statement on the first board. |
| Graphic Introduction | 1 | Assume the viewer/reader has never seen your subject. Introduce them to what it looks like. Usually multiple views are used as well as some means of conveying the scale/size of your subject. |
Include adequate images and views to clearly introduce your nature subject. |
| Visual Elements | 2-4 * | 2+ Selected topics from: Emphasize strong, thoughtful, concise graphic communication of key traits. |
At least 2 analyses of formal elements that are active in your subject. Include a written description and clear sketches, diagrams or overlays. Be clear in your content, but you may produce less finish and refinement in your illustrations than is required in the book-format projects. |
| Formal Relationships | 2-4 * | 2+ Selected topics from: balance, harmony, repetition, focal point, etc. Emphasize strong, thoughtful, concise graphic communication of key traits. |
At least 2 aspects of basic formal principles should be presented. (see note above) |
| Thumbnails | 1-2 * | 4+ examples Selected topics from: fanciful invention, design inspiration, decorative source. | Explore natural and designed forms that are related to your subject. (see note above) |
| * 7 content pages total from Visual Elements, Formal Relationships and Thumbnails | |||
| Romans 1.20 Response | 1 | Quote and respond to Romans 1.20 | Complete the Romans 1.20 essay. However, this may be presented on the back of one of your boards, or on an addendum board. |
| TOTAL PAGES For Book format projects |
12+ | Select from Visual Elements, Formal Relationships, and Thumbnails for your "extra" pages. | Most space concepts can be presented in 3 large or 4 smaller boards. |
| Credits/References | 1 | List references for all source of information, quotes and imagery. | Credits/references may be listed on the back of one of your boards — they do not have to be displayed on the face of your presentation. |
| Digital Documentation/ Portfolio Photos | Collect, organize and present your concepts, research, sketches, drafts and your final design in your Semester Portfolio. Prepare portfolio-quality photos or exports of all panels. Shoot, scan or export images of every page/panel of your Nature Study. |
Collect, organize and present your concepts, research, sketches, drafts and your final design in your Semester Portfolio. Prepare portfolio-quality photos or exports of all panels. |
|
| Misc: rigid backing, protective cover, binding | Include whatever cover or backing might be needed to protect your book during handling. Your book needs to be fully durable and functional. In particular, be sure that the binding allows comfortable use without damaging pages. BookBinding Options FAQ |
NA | |
Total Pages: |
12+ | * select one of these topics, and add additional pages of content. | |
Here are descriptons of each section of the Nature Study, listed in the typical order within the study.
Clear Plastic Protective Cover
Book format: If you are binding your own book, it is sometimes best to protect it with a heavy, clear plastic sheet. Be sure to include a protective cover this if your cover design has delicate, smearable, smudgeable features. Other protective covers might be used. The requirement is that your cover be protected from abrasions and other damage while being handled (or graded).
Space Plan Presentation: it may be wise to include a protective overlay (taped on back, folded over the top, covering any delicate panels.
1) Cover Page/Splash Page
Design your cover to offer a bold graphic introduction to the subject and character of your study.
Introduce the mood of your presentation, and introduce the design characteristics of the page layouts. This is the 'splash page' or 'home page' of your presentation. Invite and engage the viewer -- get his/her attention and draw them in.
Text content to Include: a title, "2D Design—Final Project: Nature Study", instructor's name, "Harding University", the date (or semester), and your name.Space Plan Concept Presentations: Your boards won't have a cover page, per se. However, the first board needs to successfully introduce the client to your concept and plan. Your concept statement should be included, as well as a floor plan or rendering that orients the viewer to your space.
2) Table of Contents
This page is needed to orient the reader/viewer to content within. Help them quickly see what is included, and where it is.
You may want to leave this page blank until you complete the rest of the project in case your work requires more pages than the minimums designated below.Exhibition/Space Plan Concept Presentations: You won't include a table of contents, usually. Instead, include a 'site map' or floor plan of your presentation. It offers an outline of contents and of spaces, offering basic navigation to other features presented on your boards.
Web/Flash: If you are designing a multimedia presentation, be sure that all pages are accessible/linked from here. You might consider this a site map or main navigation page.
3) Written Introduction
This page should describe the subject that you are presenting — its the beginning of the nature study.
Introduce the viewer to whatever is distinctive or unique about your subject. You might tell us why you chose it. Your might give general background information. What is it called, where does it grow, what is it known for--medicines, foods, migration habits? Whatever.
This need not be an in-depth description, but an enjoyable and informative starting point for the study to follow. Tell us what is special about your study and invite us in!.
There are several ways to approach this page. You might write this page as a response to one or more of these questions:
— What kind of a study is this? What sorts of things will I learn or explore?
— Just what is this thing? (..this fruit? ...this bug? ...this plant?) Where is it from...where does it grow? What is it used for?
4) Graphic Introduction, a.k.a. "Views" page
Present at least 3 illustrative views (top, front, side) of the object.
Provide whatever views that are necessary to show all distinctive features, positions and size.This page intoduces the reader to what your subject looks like.
Assume that the viewer has never, ever seen your subject. This page/section should show the subject from all views, and should help the viewer understand the size/scale the subject.
Usually this page/section offers several views that make clear and obvious exactly what your subject is. Assume that your viewer/reader does not already know what your subject looks like—provide views that present the entire object.It is also helpful to communicate scale — photos often do not help the viewer discern how large or small an object is. An image with dimensions added might be used. Also, and image that includes a familiar object can aid scale (e.g. a photo of a strawberry and a penny conveys the size of a strawberry.)
Photos may be used, but these images MUST illustrate a broad range of viewpoints very well. Take time to arrange and shoot images of consistent quality, in good lighting, at high resolution.
The Department of Art & Design has several digital cameras that may be checked out during the day. Talk with the Art Department secretary to find out when cameras are available. You will need to to have a faculty member sign a consent form for access to DSLR cameras.
5, 6) Visual Elements (2-4 pages)*
Include at least two pages on the visual elements: line, shape, value, texture, color, pattern & mass.
(5 or more pages from Visual Elements and Formal Relationships combined)You do not have to deal with all of the topics below — instead, present the formal elements that are most prominent in the form of your particular subject. Select the particular topics that work best for your subject.
Remember that one of your goals it to share or communicate what you have found with the reader. A brief discussion, comments, arrows, overlays, diagrams, etc. can help to make clear to your reader what you have discovered.
On each of these pages, it may be helpful or necessary to show your subject from several points of view — different views disclose different characteristics and relationships.
It may also be helpful to cut up your subject — show cross sections or other internal views. (this, of course, depends on what you are studying — some things should not be dissected here.)
Line: Emphasize significant linear features — edges, contours, aligned elements. This is not so much a drawing with lines as it is a study of linear features, edges, and axes. That is, depict and amplify linear characteristics of your subject.
Color: include a set of swatches presenting the colors used. It might be helpful to show variations on your object (if you're doing a red Jonathan apple, you can compare the red with the red of other apples, or green apples, or golden, or with the green of an immature red apple.)
Value: ideally you should explore varied local values, in contrast to values due to lighting or shading. (that would be more of a mass study — which might be a better alternate study to the value study).
Texture: Look for a variety of distinctive textures. Help th eviewer understand where these textures are found. It is usually best to provide enlargements or pullouts to illustrate texture effectively. Texture studies often need exagerated value contrast.
Pattern: Are there forms that occur and recur in a regular, or consistent, arrangement?
(also discussed under Repetition/Pattern, below)
7, 8) Formal Relationships and Design Principles (2-4 pages)*
Do full-page design studies for at least 2 of the following design topics.
(5 or more pages from Visual Elements and Formal Relationships combined)Several of these topics are similar—and some overlap. The descriptions below are meant to be suggestive of what might be explored. Your job is to explore your subject, assess its most intriguing characteristics, and then find ways to communicate those features to a reader. Select topics most appropriate to the unique form of your subject. Feel free to address several topics on a page, but be sure to present at least 2 full pages on these topics.
You may propose other topics. Describe the topic and provide a rough sketch of how that topic might be presented. Present and discuss the topic with the instructor before proceeding. Your job is to observe and present relationships among the forms present in your subject.
Harmony, Unity, [theme & variation; similarity-variety]
Explore features within your subject that are similar but different.
Graphically compare similar components while highlighting their differences.
How are differing components similar? Progressions and gradients involve a sequence of gradually changing forms.Repetition, Rhythm, Motif
Nature is quite efficient in its forms — where possible, God reuses similar forms and structures. This serves both functional and aesthetic ends.
Make clear the 'unit' that is being repeated, then show the pattern, arrangement or distribution of that unit.
The unit or motif, then, is one aspect to isolate -- it may be a part of the object, it may be a color, a texture, a line, shape or a form.
The pattern is another concern. It is often best to diagram the pattern on its own. The pattern or structure deals with how the repeated instances of the motif are organized.Balance
(formal, informal, and/or radial)
Most living forms are organized around a balanced, symmetrical structure of some sort. The left half of your body is almost a mirror of your right side — but not quite. The starfish and the octopus have an obvious radial balance. Many blossoms and plants are radially balanced — most trees have a roughly radial symmetry from an aerial viewpoint, and a roughly formal symmetry from the side. On the other hand, bonsai trees are often trained to have a marked informal symmetry — an assymetrical balance.
The structure of parts often involves an obvious balance. Select views that demonstrate aspects of balanced form. Forms may be balanced in different ways, depending on the point of view. How can diagrams and overlays make clear what you are saying about balance?
Variety, Diversity
Nature's design is very efficient — most forms are not totally new inventions, but are variations on other forms. An arm is a lot like a leg. A hand is a lot like a foot. A nautilus shell has many segments, but each segment is different, but quite similar to, the others.
You analysis involves looking for forms that are very similar, but not identical. You will then communicate (graphically), how these "parts" are similar to each other, and how they are different from each other.
Use diagrams or details to emphasize differences and variations. Images need to present and emphasize the distinct differences rather than just re-drawing more views of the objects or parts. If color is the varying element, pull out color; if shape is varied, emphasize shape; if direction/orientation, then diagram the axes that best express the varied directions, etc.
Focal Point, Emphasis, Point of convergence.
Often there are areas of visually prominent, heighted color-contrast or converging forms. It is as though the forms say "look here!" Identify these and illustrate them well. Present the forms and arrangements that direct the viewer's attention to these areas. Discuss/present why or how these areas are prominent.
Fractal Structure; Hierarchy of forms.
[Dominant and sub-dominant forms and relationships]This topic explores how the various parts of a design are related to each other — you are studying the interrelationships rather than the parts. Some designs are complex — having several, if not many, separate parts or groups of part.
Many forms branch from major to minor forms, from large to small, from body to limbs to fingers, etc. This hierarchy is a kind of structure—an ordered relationship of one part to another. Consider diagramming the underlying, abstract 'skeleton' of your subject.
Possible Subjects:
Insects have many obviously separate, but connected and related, parts. Head, thorax, legs, claws, wings, etc. The legs may have three or four segments. Each of the many legs will have roughly the same design or arrangement of part.Some plants are very complex structurally. Ferns have complex branching and leaf patterns — stems devide after a certain distance, dividing at predictable angles.
Fractal structures involve forms that are similar at both a small scale and at a large scale — small forms look a lot like the larger, general, massed forms.Golden Mean, Scale, Proportion
(Spiral forms, pentagon, golden ratio(s), Fibonacci numbers)
Look for the presence of the golden mean ratio among parts. Look for proportions that recur. Explore web sites on the golden mean, golden section, golden ratio. Look for the presence of Fibonacci numbers.
Golden Mean of Golden Ratio
Spiralling forms, patterns or structures
Pentagon
Fibonacci Numbers
Life Cycle Development
This topic is not truely a formal design topic, per se — but it does explore how forms morph or progress from one condition to another. This sequence of related forms and functions is a fascinating area of natural design.
How to Graphically Communicate this: Present the object at different stages of its life cycle -- how does its form continue, and yet change, as it grows? (this is a marvelous capacity that machines do not have) Provide enough labels and explanations that the viewer is clear what these stages are, and what the sequence is. Illustrate the full cycle.
Example Topics: A sea shell originally had a resident and builder. A flower, plant, animal or insect goes through several distinct stages of growth and development -- you might explore how the form changes through those stages, and how form stays the same (or similar) throughout the growth stages. You will need photos and/or other samples of your object to work from.
Look particularly for unusual means of reproducing and spreading seeds. Many common plants disperse seeds by remarkable processes.
Source and Context; Ecosystem; Value in Nature
This optional topic is not a pure "visual form" topic. Instead, here we explore how one plant or animal fits into a much large world of ecological activity — how does it serve other plants or animals, and what plants or animals serve it? Design involves relationships among separate parts — so this is a "system design" topic, not a "formal design" topic.
How to present: Where does this grow and what is it a part of? This is particularly useful for fruits, seedpods and other edible items that we rarely see in situ. Show the tree, plant (including roots -- especially if your item grows underground (peanut, garlic, etc.)) Show where in the world it comes from -- a map with regions of growth indicated. Show the 'family tree' if there are related plants, insects or species we might be familiar with. Show how this plant/animal feeds off of other things, and what things feed on it--how is it a part of a 'circle of life'?
Structure, Organization and/or Pattern.
[this is very similar to "Hierarchy" topic, above, and is somewhat similar to Balance concerns -- or, at least, balance is often a structural issue. The concept of hierarchy is a bit more specific than "structure"; hierarchy is a kind of structure.
Look for arrangements of parts — how do parts fit together? Look for alignments and underlying patterns. Then abstract that arrangement. (for instance, a fish's scales may be laid out in a sort of diamond-grid pattern.)
How do the petals of a rose fit into the rose bud -- note their arrangement of spiraling, overlapping petals. How do the rose petals support themselves? (the curved petal is a relatively sturdy structure--until softened by decay, or bruised, or bent so that fibers are broken.)
Look for magnetic field structures, spirals, progressions (from larger to smaller), fractal patterns, etc.Range of Motion, Transformation — Folding, unfolding, bending and turning.
Look for forms that transform into distinctly different forms or positions.
Remember your transformer toys—what did designers have to understand in order to plan those multi-formed forms?God's creation does it all the time.
Look for wings, legs or bodies that open, expand or contract, straighten or bend.
Flower blossoms must be able to expand from tight buds to broad, open and stable blossoms—how does that happen?Flowers opening timelapse from David de los Santos Gil on Vimeo.
Rolly-polly pillbugs can curl up into a ball or open up and walk around—what forms make that possible?
Present how these changes in form occur. A pine cone, for instance, opens and closes when wet vs. when dry. Many growing forms rely on protective shells, pods or buds that 'open'. Consider exploring the joints or hinges that allow parts to move. Present the differing positions--the various states of open and closed.
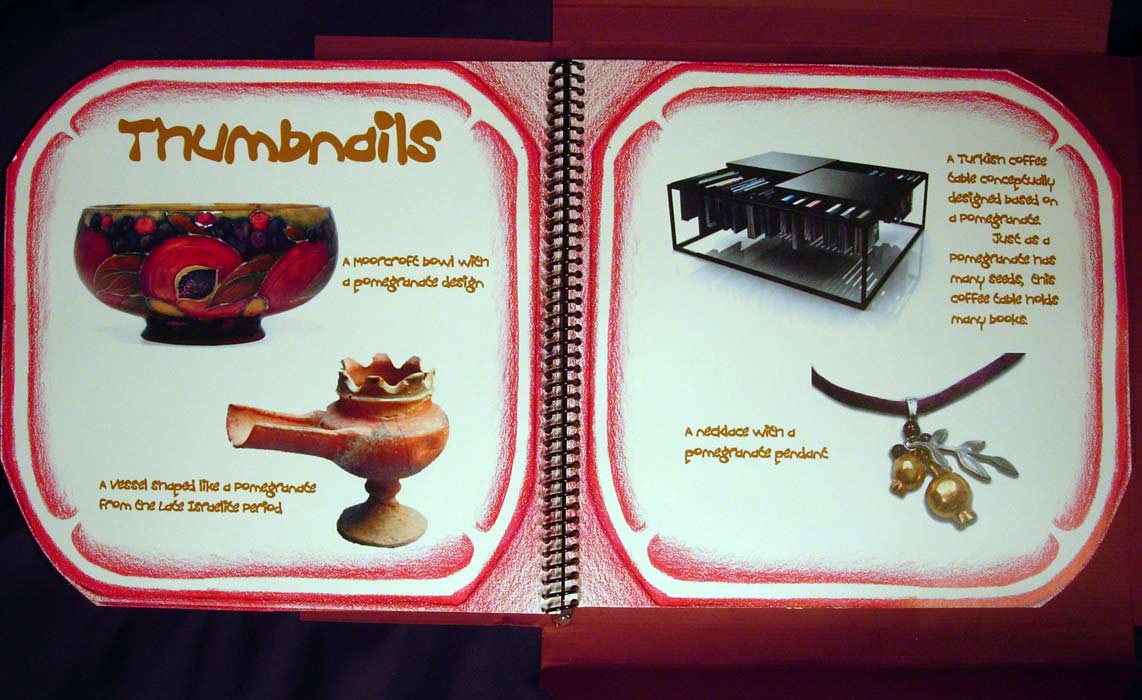
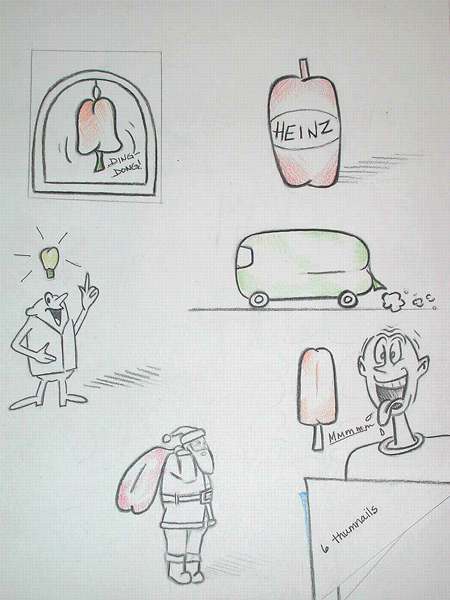
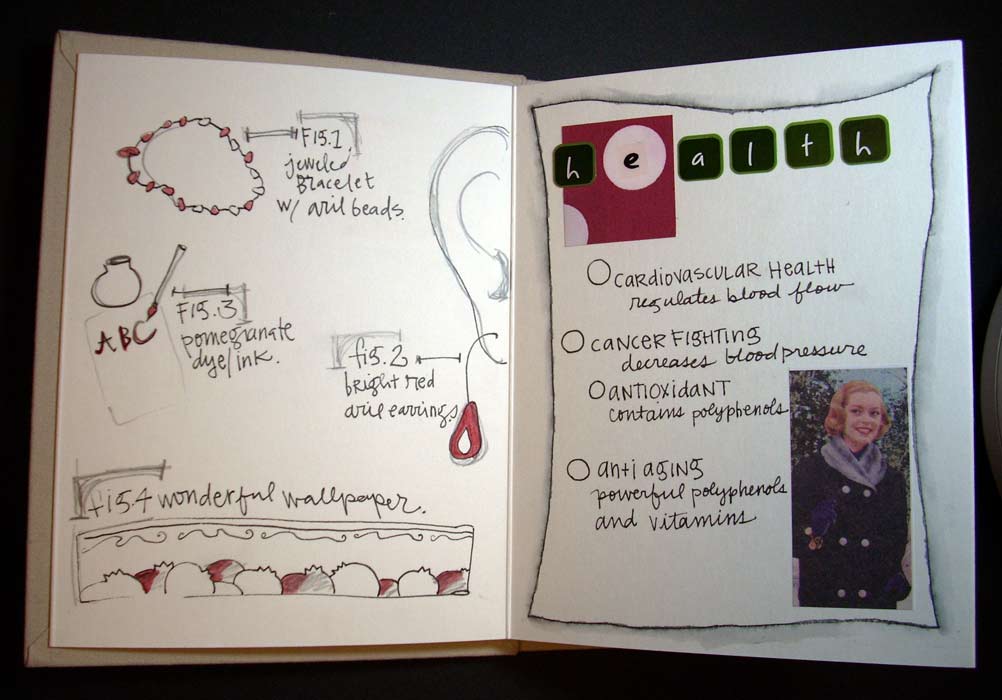
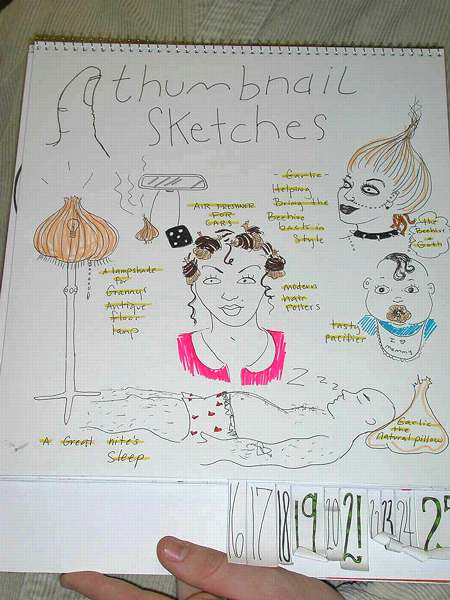
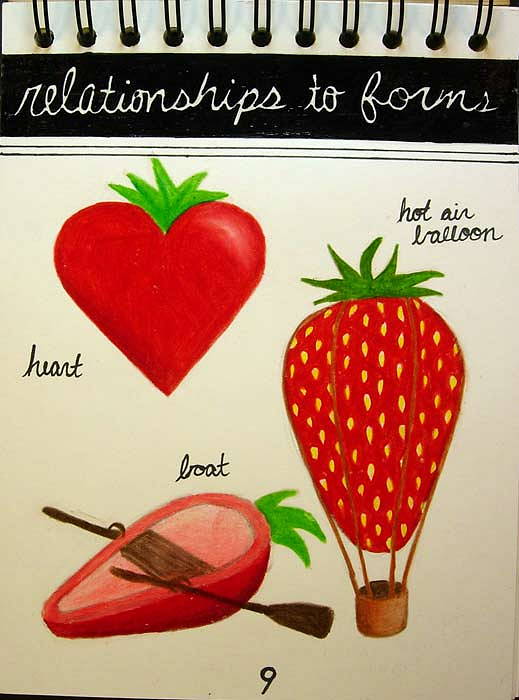
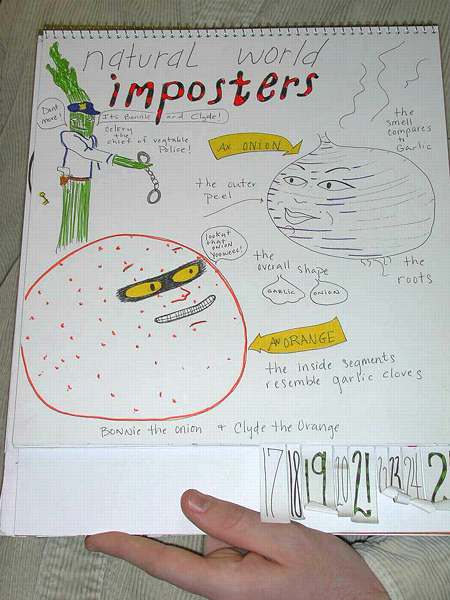
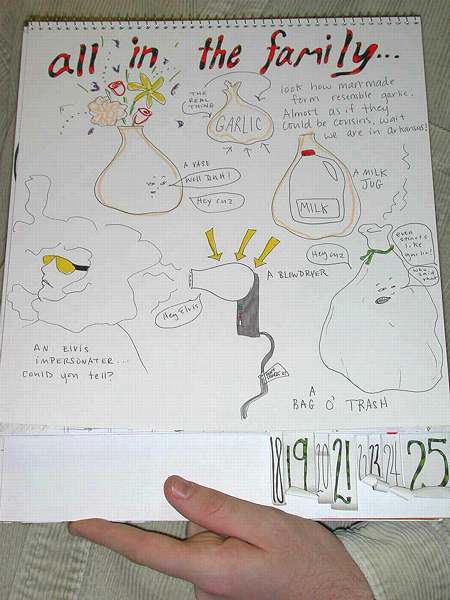
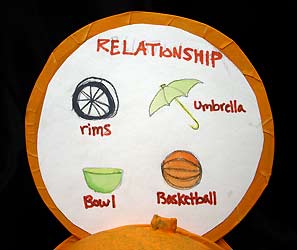
9) Relationship to other Forms (a.k.a.Thumbnail illustrations) (1-2 pages)*
There are four possible approaches to this topic — pick whichever perspective works best for your subject.
In essence: Look for ways in which the form of your subject could be, or has been, used in other completely different designs.
Provide at least 4 sketches or concepts in your study.
You may work from more than one of the following four topics.
Complete one or more pages total.
Graphic communication tactics: Sketch, illustrate, clip photos or modify photos.Option 1: References in Decorative Design
Find existing man-made designs that use your subject to enhance decorative quality.
For instance, carved furniture may use decorative leaf shapes.
Wall-paper might have fruit designs.
Jewelry might have vines or blossoms.
Corinthian columns have canthus leaves.
Look at paintings, sculpture, jewelry, prints, weaving, ceramics, graphic designs, interior design fabrics, illustrations, decorated pottery and glassware — all sorts of designers refer to nature's portfolio for ideas.Where have other designers noticed the visual appeal of your subject, and made use of it in their own designs?
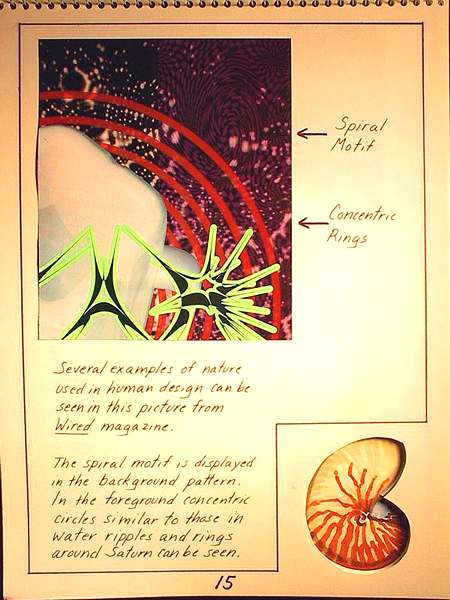
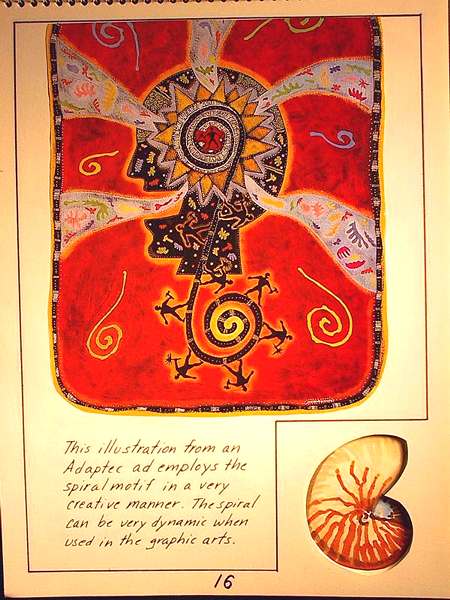
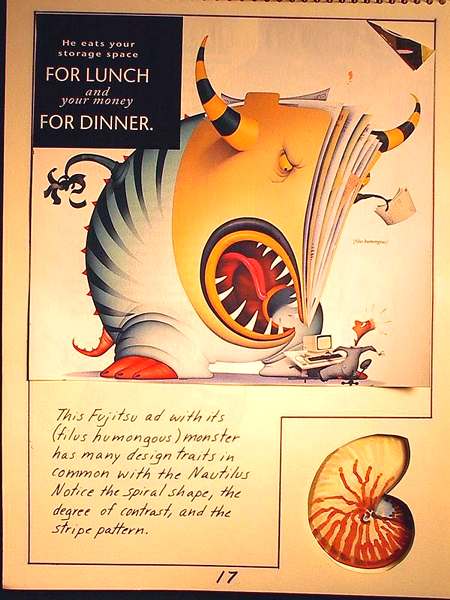
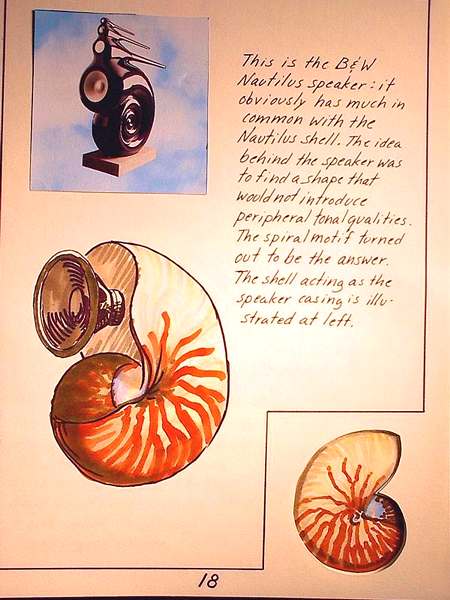
examples: dragonfly (upper right), nautilus shell, (2), (3), (4), (5), pomegrante(2),
Option 2: Fanciful Invention
Brainstorm about ways that your subject could be used as (a part of) a functional object.
Feel free to get a bit bizarre here. How could the form of your subject be incorporated into newly-invented man-made, functional objects?
examples: kiwi, pinapple, bell pepper, pomegranate, garlic, pinecone,strawberry,
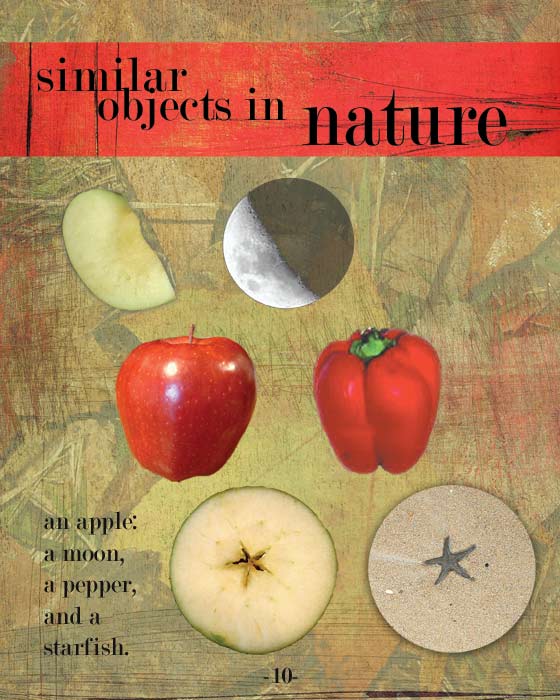
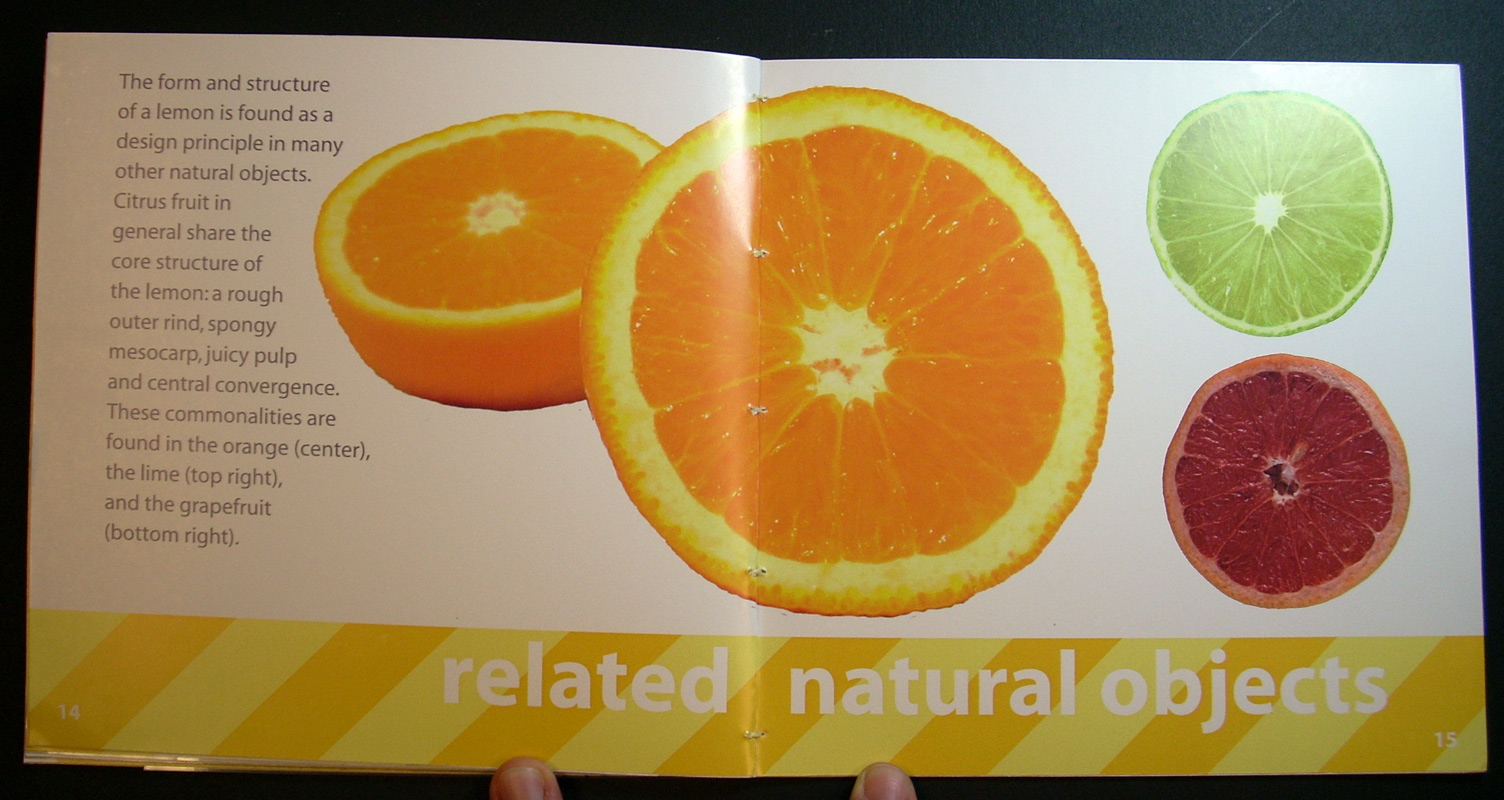
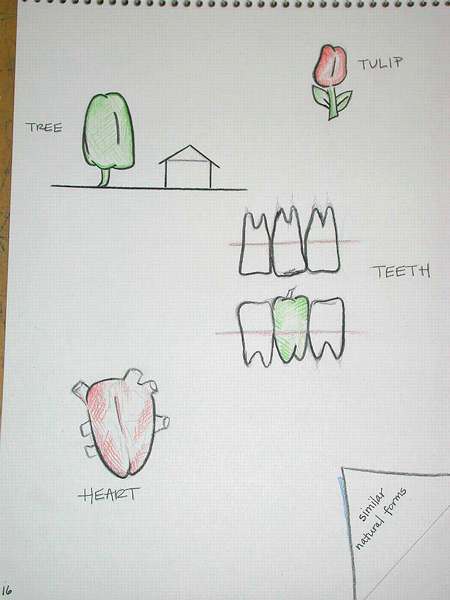
Option 3: Related Natural Objects
Find other objects in the natural/living world that are similar in design and structure to your subject.
Search for objects that are as different as possible, yet display some important, similar qualities. (e.g. mushroom & a jellyfish)
examples: apple, lemon, bell pepper, garlic, butterfly(1), (2), (3), pinecone,
Option 4: Related Manmade Structures
Find objects among existing man-made forms and structures that relate to your object's structure or design.
examples: garlic, butterfly(1), (2), (3), orange, pumpkin, dragonfly (left side),
(note: 'Fanciful Inventions' do not yet exist. 'Related Manmade Objects' already exist.)
A dome, for instance, relies on the same structural traits as an eggshell. Robotic arms rely on the same structures as many animal arms. Robotic claws and a crab's claws rely on the same principles. A squid and a rocket use similar propulsion principles.
10) Essay on Romans 1:20
[last content page of your nature study; 125+ words]
Write an essay on how your subject is related to the insights of Romans 1:20. Paul there explores how the form of creation itself reflects the character of the creator.
Quote the passage and then give your response. Take time to ponder Paul's thoughts about a natural creation that reflects the presence and character of its creator. More importantly, reflect on what meaning, implications or message you discern in the form and design of your nature subject -- what is nature's design telling you personally?
11) Credits/References
Reference any sources of your study's content.
Includes sources (web URL's) of photos or images that you have copied.
Provide references to information that you either quote or restate — any data or textual content.
Reference web sites/links, books or magazines of any aquired images.
No formal reference style is expected -- merely acknowledge the sources you have used.
Digital Documentation (due for all nature studies)
In essence: Create a digital copy of your nature study—a version of your study that the professor may keep.
This is organized and presented in your Semester Portfolio.You will present all stages of concept development, research, sketches, drafts and final presentation in your SP.
Scan or photograph each page of your study.
Note that it is generally better to use a scanner than to take digital photos—lighting is controled and resolution and allignment are easier to manage. Use a camera only if your study is a) quite large, b) 3-dimenional or c) interactive.Create a .jpeg image of each page and of details of any major illustrations.
(note: turn in "JPEG" format images. If you did your project in Photoshop or Illustrator, use the File:Save For Web... command to convert you page layouts to JPEG files. )(Also, image format need be no larger than 1200x800 pixels. File size per page should be no larger than 250k. If these technical issues are not familiar, ask about them.)If you create a traditional book-format nature study, you may either scan each page or take good quality photos of each page of your study. If you do not own a digital camera or cannot borrow one, you will need to schedule time to use one of the Art Department's digital cameras, or you may use the scanners in the MacLab.
JPEGs/GIFs/PNGs of Digital Files:
If you created your project digitally — each page laid out in InDesign or Illustrator or Photoshop (etc.) — then you can create .JPG images directly, within your graphics software. The correct command varies from program to program, but will likely be either "File: Export.." or "File:Save As..." or "File: Save As for Web".
Save images roughly 2 megapixels in size (say 1200x1800 pixels ...though proportions vary from project to project)
You might also make a screen-dump of each page or view of your study. (both Macs and PC's have keyboard combinations that produce a picture of whatever is on screen. You'll may need to crop and organize these—give each image file a filename indicating the page number or heading. (MacOSX users — see the "Grabber" utility. Applications: Utitlies: Grabber)Good Quality Images:
Give attention to alignment, color quality (lighting), value range, focus, resolution, fill frame, align the page with picture plane. Avoid flash glare.Edit photos digitally for best contrast, cropping, alignment, etc. Save all images as JPEG images approximately 800hx600v resolution, or higher — no bigger than 3 megapixels. Use medium-high quality (~70) JPEG compression. DO NOT turn in raw Photoshop, Illustrator or InDesign files alone — be sure to turn in .JPG format images ( .PNG is fine too.)
Name each of the files with your first name initial and your last name, then a number referring to the page number. (GClayton07.jpg)
Number your files according to the page number of your study -- note detail images. Dburks01.jpg --- would be page one for the nature study of some guy named Burks. Dburks00.jpg would be the cover page. Dburks03DetA.jpg would be a detail photo taken from page 3.
Shoot detail photos of at least 5 particularly interesting images in your book. (filename same as above, but add DetA, Dburks12DetB.jpg' would be the second detail photographed on page 12 of David Burk's nature study. [What subject would he pick for his study, anyway? ]
Greg Clayton |
Design Foundations I |
Design Foundations II |
Senior Seminar |
|||||
Photography Course |
Course Schedule |
Course Schedule |
Independent Study |
|||||
| © 2019 Greg Clayton/ gclayton@harding.edu |